
< jr:table >..< /jr:table > component in Jaspersoft Studio

Welcome Guys...!!!

Today v'll learn inserting table in a report using Jaspersoft Studio.
Basically Table component is used for displaying records with SEPARATE DATASET and different query other than Main Report query.

Step 1 : Table component is always placed under SUMMARY band. If its placement is under detail band, entire table will print all over again multiple times to which equals to the result of RECORD COUNT in SQL query.

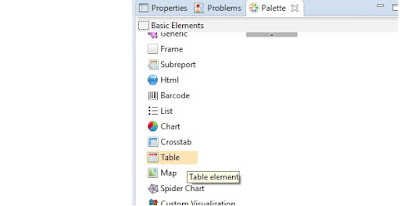
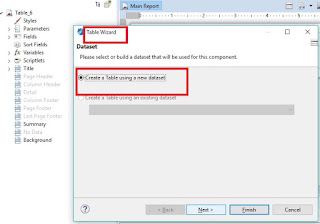
Step 2 : Create Dataset dialog window will be shown as below as soon as we drag Table element from palette. Select which Dataset is required for table to display, if datasets is already present in a report.Click Next.
 

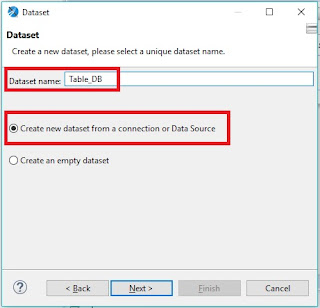
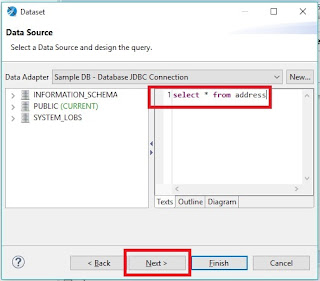
Step 3 : Selection of Data Adapter for creating New Dataset and click Next as shown in below screenshot :


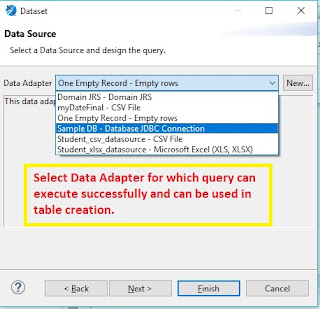
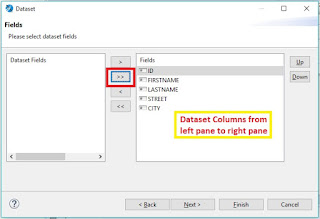
Step 4 : Writing query of the data adapter selected.Click Next. Select Fields which are required in that dataset. Click Next.
 

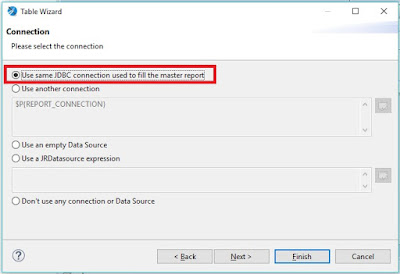
Step 5 : This is an important and final step which can decide the output of the Dataset. Selecting Connection for which the Dataset will respond.
There are various ways to add connections if the Dataset is not a part of Main report connection.Currently v'll be using Master connection which act as Main report connection.Click Next.


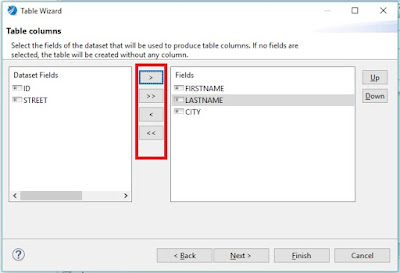
Step 6 : Columns which are required in table output will be selected here.Click Next.


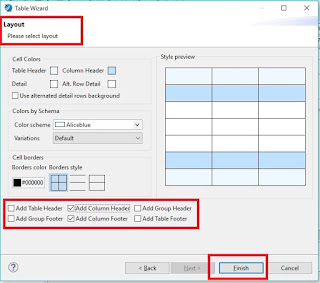
Step 7 : Layout of table like Color effects, cell borders, Header & Footer selections etc. can be chosen here.


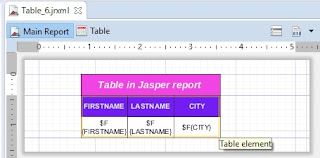
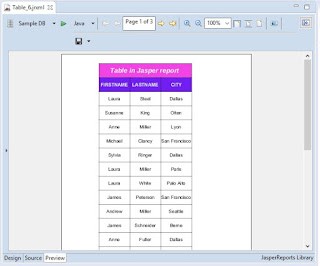
Step 8 : Rearrange the x&y axis and w&h position of table that can make table look like attractive report and preview the report.


Check my next post for more advanced level of table creation and usage.


Hope you enjoyed.

For more queries please contact me on:  miwagada@gmail.com.

Comments

Popular posts from this blog

$X{....} Parameter in Jasper report

Welcome Guys..!!! Today v'll learn Third type of Parameter $X{..} which is most useful while filtering a query. $X{...} Parameter acts as "conditions" applied to SQL query in where clause separated by Logical Operators (and / or ). 3 Basic steps to use $X{} Parameter in a report. Step 1 :  Change in Parameter "Default Value Expression". Step 2 :  Change the Report's "Dataset and Query Editor" Property with below keywords with correct syntax. Step 3 :  Preview and check the report output which works exactly as required. Below are the various keywords used in $X{} Parameter with different syntax and explained briefly their meaning with executable report screenshots. 1) EQUAL 2) NOTEQUAL 3) BETWEEN 4)  [ BETWEEN ] 5)  [ BETWEEN 6) BETWEEN ] 7) GREATER 8)  [ GREATER 9) LESS 10) LESS ] 11) IN 12) NOTIN 1) EQUAL : Keyword "EQUAL" works exactly as "=" (equals) operator in SQL ex : select * from address wh

XLSX, XLS or CSV as Datasource in Jasper Report

Welcome again !!! Today v'll be learning how to create data source using Excel or CSV sheet and generate Jasper report. Kindly follow below simple steps to fulfill your requirements. Step 1 : Create CSV / Excel file Using Microsoft Excel or other applications which supports extension of .csv / .xlxs / .xls formats.      Step 2 : Create Blank Jasper Report using 'One Empty Records Empty Rows' as Data source. Step 3 : Go to Repository Explorer Window > Data Adapters > Create Data Adapters. Step 4 : We can select ' CSV File ' for accepting CSV format file as datasource or ' Microsoft Excel (xls, xlsx) ' for accepting XLSX or XLS format file as datasource. Step 5 : Add the settings as shown in the below image for both the xlsx, xls and csv format : If the first row in CSV, XLSX files are the column names identifying the definition of records, check ' Skip the first line (the column names will b

Techniques for Inserting Image in Jasper report

Welcome Again...!! Today we will be learning how to insert Image element in a report using Jasper Studio. Step 1 : Create a blank report named "inserting_image.jrxml" Step 2 : Drag Image Element from Palette in Page Header Band as shown in screenshot. (Normally, Image Element is placed in Title, Page Header or Group Header Sections). Step 3 : Select Image path from the list. In this example v'll be using "Absolute path" as a image location. There are different storages where image is saved. a) Workspace resource : Image location stored in the workspace where all reports are developed. b) Absolute Path in the filesystem : Image location in your local desktop. c) URL : Link and name of image with extension (.png, .jpg, etc.) saved in the webpage. d) Select a resource from JasperReports Server : Image location where image file is saved in JasperReports server. e) Custom Expression : Image location with extension where image is stored. (It c

$P{...} and $P!{...} parameter types in Jasper report

Welcome Guys...!!! Today v'll learn most important first 2 types of parameters out of 3. 1) $P{Parameter_Name} 2) $P!{Parameter_Name} 3) $X{.......} Third type of Parameter is briefly explained in my next post for more deeper understanding. Step 1 : Create a executable report with a query where there are no parameters at first. In current example I will be using " select * from address " .    Step 2 :   Assuming filter on Field "City", here we will use following code in query. "select * from address where city= $P{city_name} " $P{city_name} is a newly created parameter with properties set as shown in below screenshot. Check or uncheck "Is for Prompting" property as value mentioned in "Default Value Expression" is set to "Dallas" . Hence ResultSet will only return records with city which matches value as Dallas.   Step 3 :  Finally 1st type of Parameter $P{...} returns desired output as shown in be

Create a first Jasper report using built-in JDBC connection in Jaspersoft Studio

Welcome Guys...!!! Today v'll learn the first report creation in Jaspersoft Studio from default database connection embedded in Jaspersoft tool. Step 1 : Open TIBCO Jaspersoft studio Community / Professional version Tool. Download Jaspersoft Studio from link: https://community.jaspersoft.com/download Step 2  : Create New Project "Blog_Posts" by clicking on File > New > Project in Toolbar. Step 3 : Create New Jasper report "sample_template" by right clicking on Jasper Project "Blog_Posts" > New > Jasper Report. Step 4 : Selecting a Sample JDBC Connection in-built in Jasper Studio. There exists various types of database connections which is supported by Tibco Jaspersoft Tool. In this Post, v'll be using default JDBC connection as shown below : Step 5 : Writing queries of supported database. As a sample report we will pass simple query without semicolon:                                                       &qu

Tibco Spotfire Architecture

Spotfire Architechture Lecture 1 : Spotfire Architecture On-Premise Setup : It contains Spotfire Server(Processing logic) as a BOX and Spotfire DB (Enumerable Databases with connector provided by spotfire). Anything server connected client saves in spotfire server is directly saved in spotfire db. Client and Server should not be in same machine. Spotfire Cloud (Software As A Service) : Server + Spotfire DB goes to Cloud. Admin work(Configurations, Security, Client setups, db connectivity, payment for spotfire server and db, maintenance, etc)   is to be done by cloud organization. Hence its called SAAS. Unlimited Scalability (performance, ram size increase when number of client adds to spotfire server. OLTP Connectivity: ( Not allowing pressure on OLTP (max one month Data not the historical Data i.e not Live Data) hence creating Data Warehouse for accessing Data using ETL). ODS (Operational Data Store) can store Historical Data